 YNSPIRA
The NotebookLM guide you didn't know you needed


This article contains subjective opinions and claims.
NotebookLM might be the most underrated and underused tool in AI right now.
The point of this guide is to help you, if you haven't tried NotebookLM yet, or if you've only poked at it casually (like I did at first), with:
-
Understanding what the tool is actually built for
-
When to reach for it, and what for
-
Using it in a tidy, sensible way
A lot of people know NotebookLM as "the thing that turns text into a podcast". That's just the tip of the iceberg. NotebookLM has a pile of other uses that make it one of the most genuinely useful tools out there.
The guide has 5 parts:
-
What is NotebookLM and how is it structured?
-
What can you use NotebookLM for?
-
How do you use it well?
-
What sets NotebookLM apart from other AI tools?
-
The most important tips, in short.
1. What is NotebookLM and how is it structured?
NotebookLM is Google's AI tool for research, knowledge work, and content production. Think of it as an AI workspace for a project, topic, or subject area. Not primarily a place to store files, but a place to actively work with the content you already have.
Once you add your sources, NotebookLM can help you spot patterns, links, and connections across the material. You can use it to dig deeper, compare perspectives, ask questions, and notice things you might have missed on your own.
That makes it especially useful when you have several sources you want to understand and process over time, for example in a project, a research effort, or a subject you want to go deep on.
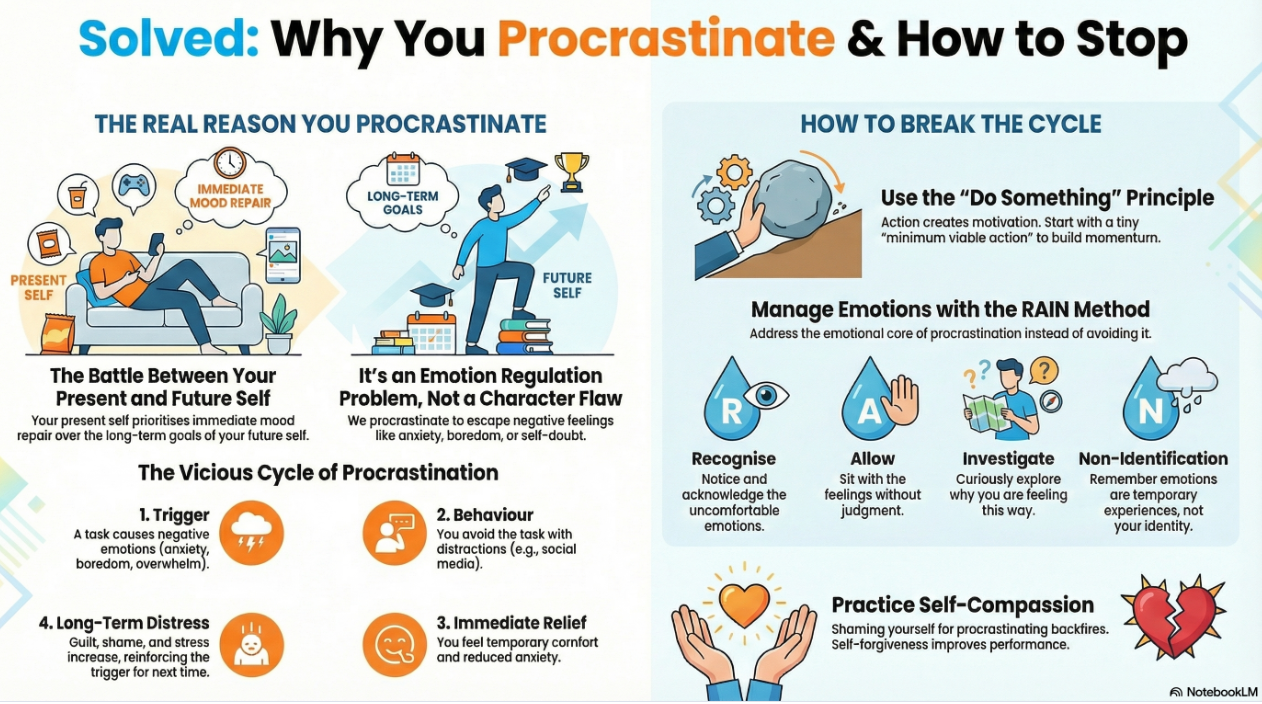
On top of that, NotebookLM can turn your material into new and more engaging formats: presentations, audio summaries, mind maps, infographics, flashcards, and more.
Use NotebookLM when you want to actually work with a body of material over time, not just when you have a single quick question.
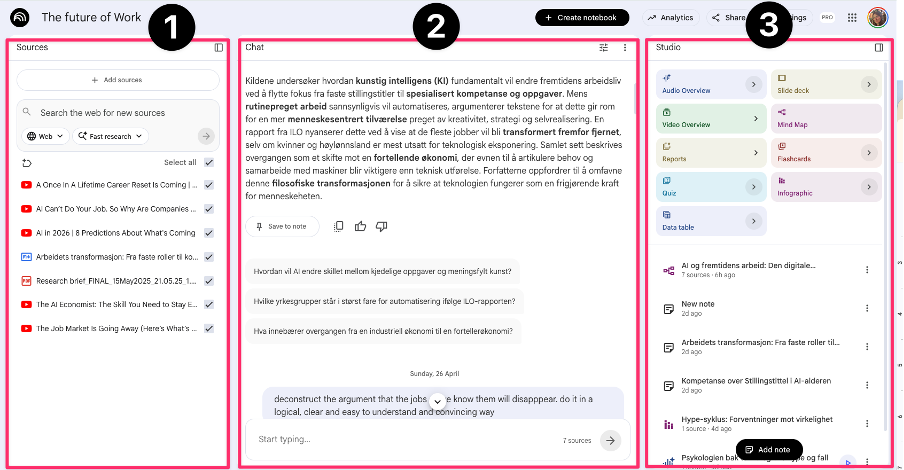
The NotebookLM window has 3 elements
Sources
Sources, in the left panel. Sources are the core content of your notebook, and they're what every chat conversation and every Studio output is built from.
Chat
Chat, in the middle. This is where you talk to the AI about the material in your sources and ask detailed questions.
Studio
Studio, in the right panel. This is the "production area", where you create things based on your sources.
2. What can you use NotebookLM for?
Some examples of what you can use NotebookLM for:
Work projects
Do you use Google at work? Then you can use NotebookLM to organise your projects and use AI as a sparring partner. Add the relevant sources, and use NotebookLM to work through the information, dig into the content, get more insight, and surface connections.
Exploring a topic you're interested in
Set up notebooks for topics you want to understand better. Drop in articles, videos, and other content you already have on your reading or watch list, and use NotebookLM to explore the sources, build mind maps, and approach the topic from different angles. You can also generate and read through reports and visual presentations, and add your own notes and reflections to the notebook.
Learning
NotebookLM is especially useful when you want to make heavy or text-based study material more engaging. You can generate visual presentations, audio summaries, quizzes, and flashcards from your study material. It makes learning more interactive, more fun, and easier to revisit.
Holiday planning
If you just want 10 things to do in Cancun, you don't need a notebook for that. But if you like to nerd out and actually go deep on the culture, the history, places to visit, pubs, restaurants and so on, you can absolutely build a dedicated notebook for it.
3. How do you use NotebookLM well?
Start by adding sources to your notebook
What can you add as sources? Almost anything. The tool gives you a lot of freedom on source format. You can add Word, PPT and CSV files, audio files, plain text, links to web articles, or YouTube videos.
You can either pick every source by hand yourself, or ask NotebookLM to search the web and suggest sources for you.
Personal tip: I tend to add sources manually to make sure the information in my notebooks is top quality (I either use my own files, or other reliable sources I trust).
Click a source to open an overview summary, the topics it covers, and suggested questions you can explore further.
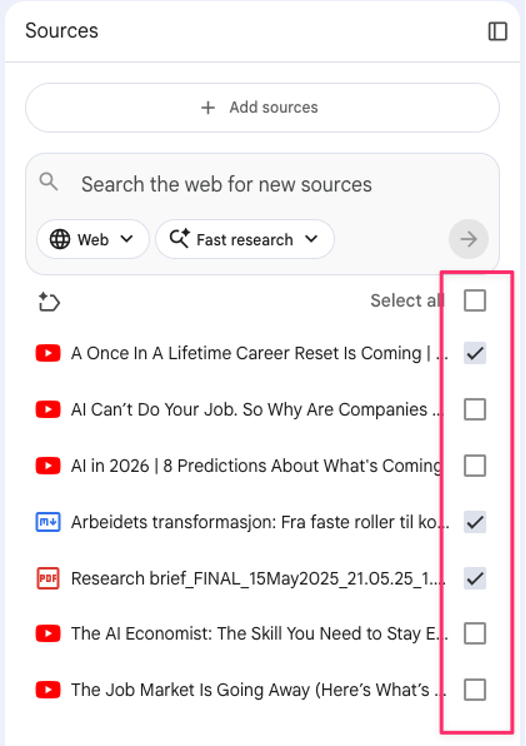
Want to focus on a subset of sources rather than everything in the notebook? Use the checkboxes in the left panel to choose which sources you want to chat about or work with.
How to use Chat properly
Use the chat to talk about, understand, and dig into your sources.
The chat only answers based on the sources you've added, which substantially cuts the risk of hallucinations.
Every main claim in a chat answer comes with a clickable reference, so you can find and verify the specific information directly in the source it came from.
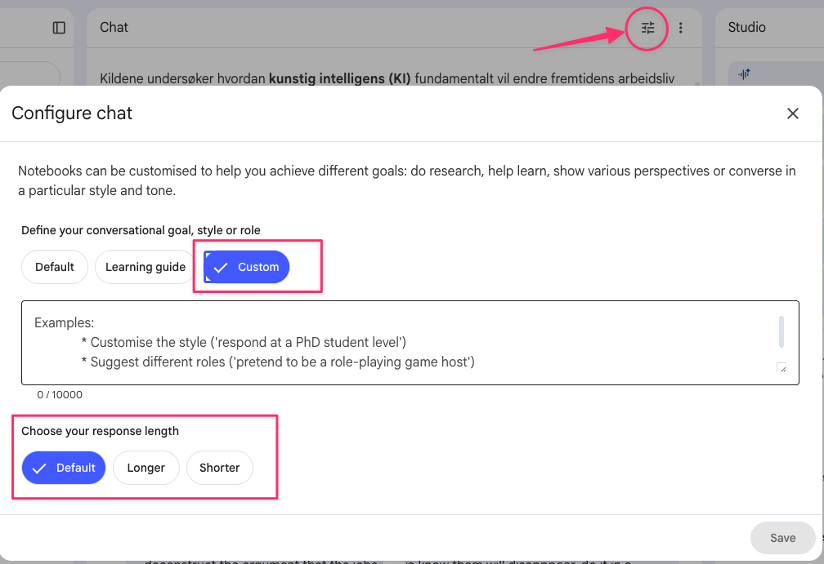
Pro tip: Use the "Configure" button (Configure notebook) at the top right of the chat window to personalise your assistant. You can give the chat a specific role, purpose, define style and tone, or add other instructions for how the AI should behave.
Studio, the most magical part of NotebookLM
In Studio you can turn the information from your sources into more engaging, tidy, and visual content, with minimal prompting.
Examples of Studio outputs:
Slides
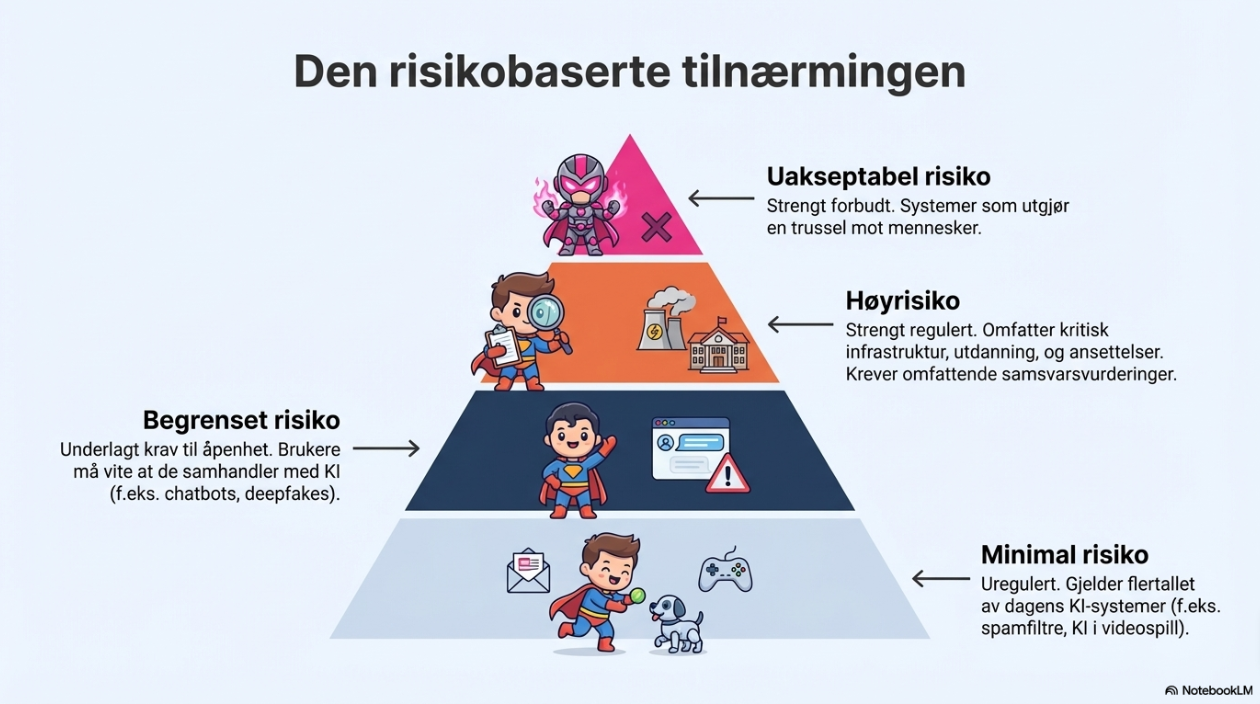
Infographics
Flashcards
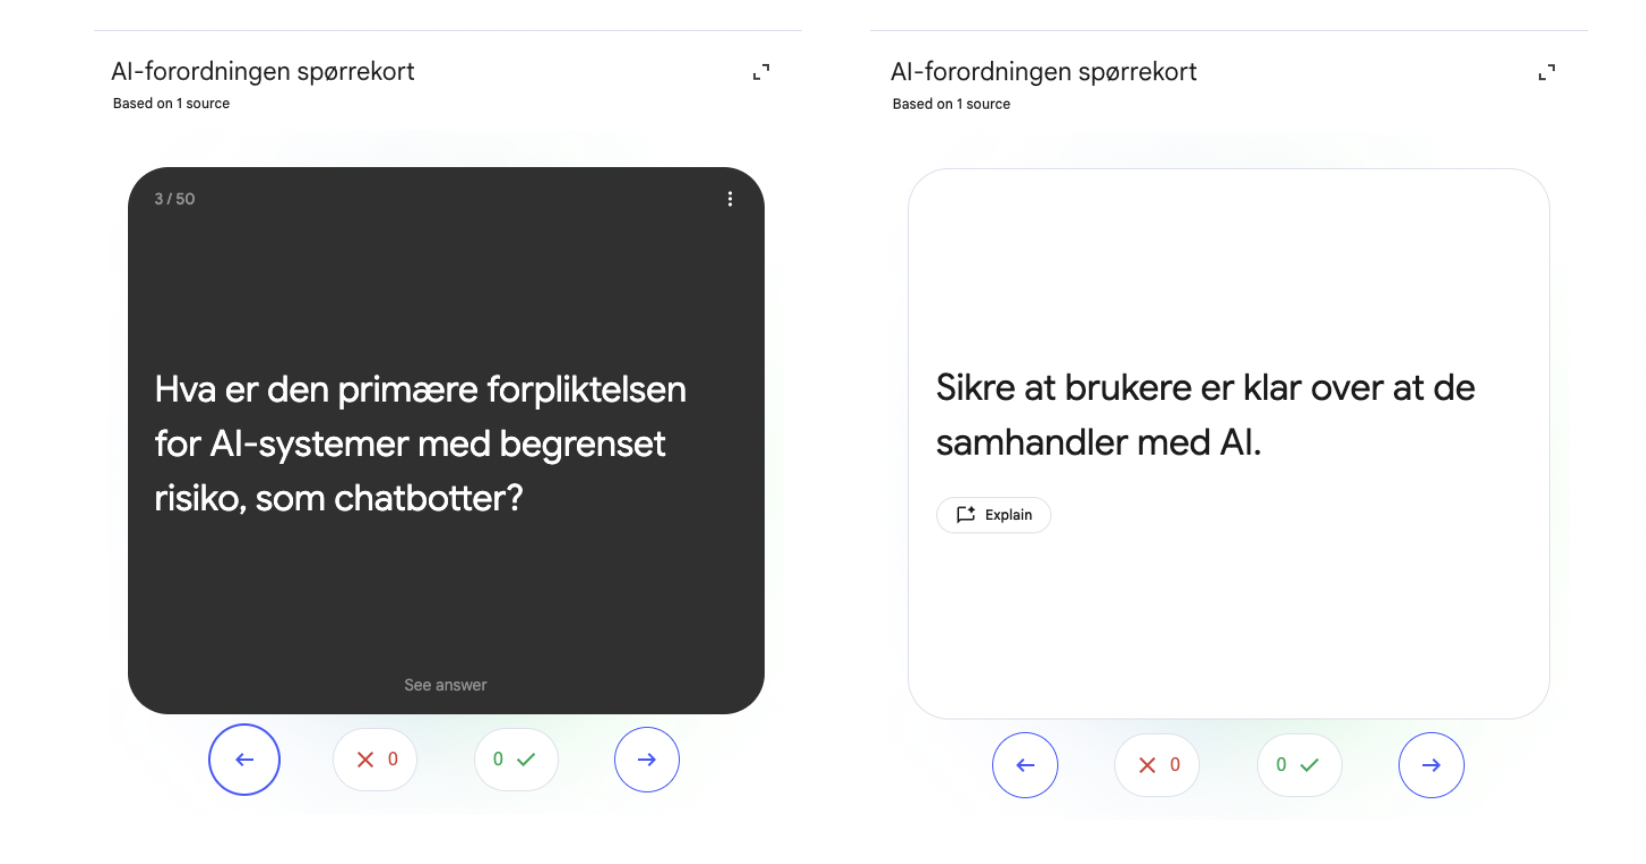
You can use Studio to:
-
explore and work through your material in depth using interactive mind maps
-
create visual aids you can use to dress up presentations or posts (for example infographics or slide decks)
-
get inspiration for storyline or first drafts of presentations, reports, or similar
-
build your own learning aids (for example flashcards, audio summaries, or quizzes)
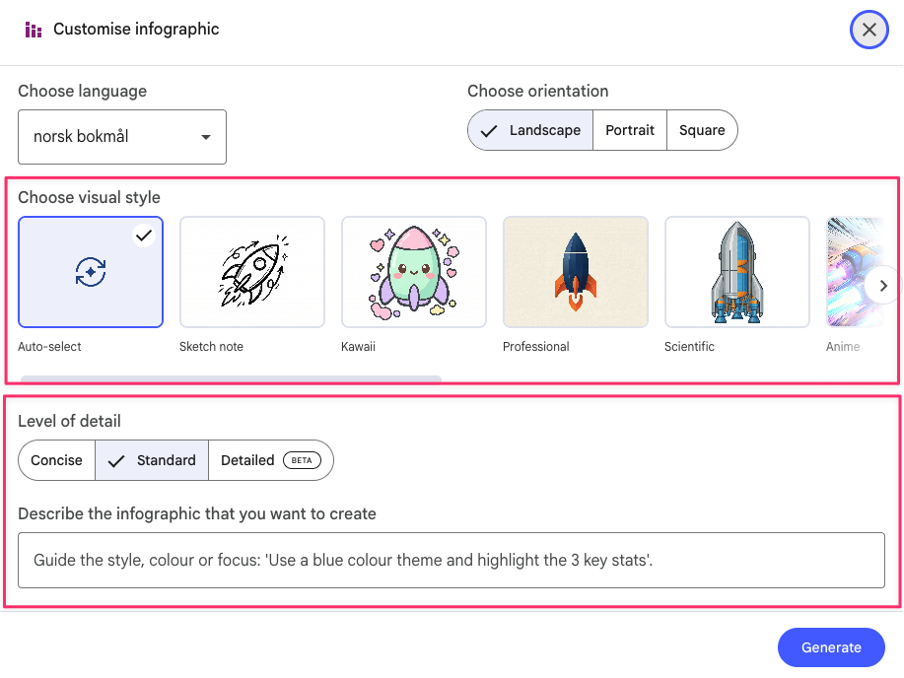
Pro tip: Use the small arrow next to the format you want, to customise the output you're generating in Studio. The biggest mistake most people make is just hitting the "Generate" button next to the format they want (for example slide deck or infographic). You can give specific instructions to adjust colours, style, or level of detail in what you're creating.
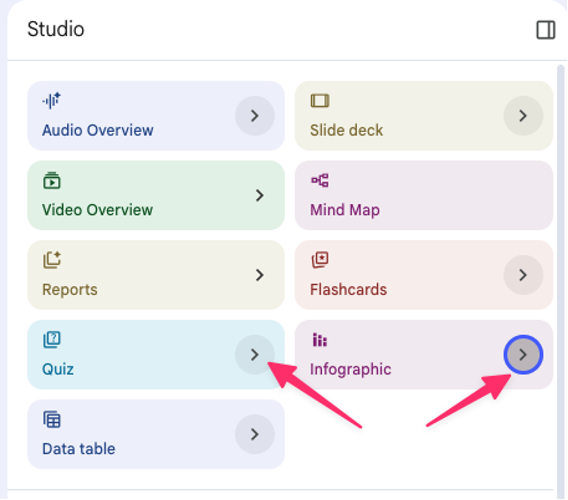
You can download and export most outputs as PDF, Slides, or Sheets. Editing Studio outputs after they're generated is fairly limited, though. For slide decks you can use the Revise button to ask for changes per slide in text, layout, or graphics.
You can also just regenerate things, of course, and tweak the instruction to get closer to the result you want.
Remember to filter which sources you want the output based on. You do that the same way as in the chat section, by ticking the sources you want to use in the source panel.
4. What sets NotebookLM apart from other AI tools?
NotebookLM only answers based on the sources you've added. That cuts the risk of hallucinations or guessing considerably. The tool isn't built for creative writing or brainstorming.
NotebookLM is exceptional at handling sources in just about any format, including PDFs, text files, PPT files, image files, audio files, links, YouTube videos, and more.
It's also seriously good at pulling relevant information out of your sources and turning it into engaging outputs. That includes infographics, reports, presentations, flashcards, and audio summaries (a natural, AI-generated podcast-style conversation).
The free version is extremely generous. You can create up to 100 notebooks, add up to 50 sources per notebook, and each source can hold up to 500,000 words. That works out to a total capacity of roughly 25 million words (!) per notebook.
5. The most important tips, in short.
Make one notebook per project, topic, or subject area
This is a good way to organise your content. Each notebook is its own workspace where you can explore, summarise, and produce content based on your sources.
Pick the right language in settings (the cog icon at the top right)
The language you pick applies to the chat and to anything you generate in Studio (presentations, infographics, reports, etc).
Use good sources
The better the quality of your sources, the better the answers. Add your own files, articles, videos, or other sources you trust.
You don't need to use every source in a notebook every time
Remember you can filter and tick the sources you want the chat conversation or Studio output to be based on.
Use the chat to understand and dig into the material
Ask questions, ask for explanations, compare sources, and click the references in the chat to check where the information came from and confirm it's right.
Use the Configure button at the top of the chat window to personalise
Give NotebookLM a role, the tone you want, the style, or other instructions for how it should answer.
Use Studio to make heavy material more engaging
Studio can produce mind maps, reports, presentations, infographics, quizzes, flashcards, and audio summaries from your sources.
Don't just hit Generate in Studio
Remember you can add your own instructions and preferences before you create something in Studio (for example style, language, level of detail, colours, and format).
Each notebook is its own thing
NotebookLM can't pull information across multiple notebooks at the same time. Anything you want to use together should sit in the same notebook.
Re-sync Google Drive sources when they change
If you use files from Google Drive as sources, you have to refresh or re-sync them manually for NotebookLM to use the latest version.
 NotebookLM